You bought the template. You’re excited. And then you open Showit and realize there are about forty-seven things you need to do before you can actually hit publish.
Sound familiar?
Launching a Showit website template is genuinely not that complicated once you know the order of operations — but nobody really lays that out clearly. So that’s what this post is for. A straightforward, start-to-finish walkthrough of how to actually get your Showit website live, without the guesswork.
And if you want something you can physically check off as you go, grab the free Showit Website Launch Checklist at the bottom of this post.

Step 1: Handle the Business Basics First
Before you even open Showit, there are a few foundational things to sort out — and doing them in the right order will save you a headache later.
Choose your business name and lock it down. Check that the domain and social handles you want are actually available before you commit to anything. If they’re not, brainstorm until you find something that works across the board. Changing your name after launch is a real pain.
Register your business name with your local government if you haven’t already. This looks different depending on where you’re based, but it’s worth doing early.
Set up a domain email address. Something like hello@yourbusinessname.com. Free Gmail addresses work fine personally, but a domain email makes you look far more professional to potential clients. Google Workspace is the most common option and is straightforward to set up.
Purchase your domain once you’ve confirmed the name is available. You’ll need this later to connect to your Showit site.
Step 2: Get Set Up in Showit
Once your business basics are squared away, it’s time to actually get into Showit.
Choose Your Template If you haven’t picked your Showit template yet, that’s your actual first step. Everything else builds from there — your pages, your layout, your overall design direction. Browse the Vanilla + Oak template shop to find the one that fits your brand: https://vanillaandoak.ca/showit-templates
Already have your template? Move onto the next step.
Sign up for a Showit subscription. If you’re new to Showit, you can use the code VANILLAANDOAK to get your first month free. Showit has a few plan options — most photographers go with the plan that includes a WordPress blog, which is worth it for SEO.
Install your template using the Share Key. Every Showit template comes with a Share Key — a code you paste into Showit to clone the template into your account. Your template documentation will walk you through exactly how to do this, and Showit’s own help center is great if you get stuck.
Watch Showit’s beginner tutorial. Seriously — even 20-30 minutes of orientation will make the whole customization process feel much less overwhelming. Showit’s drag-and-drop editor is intuitive, but it has its own logic that’s worth understanding before you start moving things around.
Step 3: Organize and Upload Your Media
This step trips a lot of people up because it feels like a small thing, but doing it right from the start makes everything easier.
Create folders in your Showit Media Library before you start uploading anything. Organize by page or section (homepage images, about images, portfolio, etc.) so you can find what you need without scrolling through a wall of photos.

Upload your photos, logo, and favicon into those organized folders. Your favicon is the small icon that shows up in a browser tab — usually a simplified version of your logo or a single initial. Don’t skip this; it’s one of those small details that makes your site feel finished.
Rename and resize your images before uploading. This is an SEO step that most people skip, but it matters. Instead of uploading a file called “IMG_4823.jpg,” rename it something descriptive like “vancouver-elopement-photographer.jpg.” Search engines read file names, and this is an easy win.
I’ve written a full guide on exactly how to do this: How to Prepare and Resize Images for Your Showit Website.
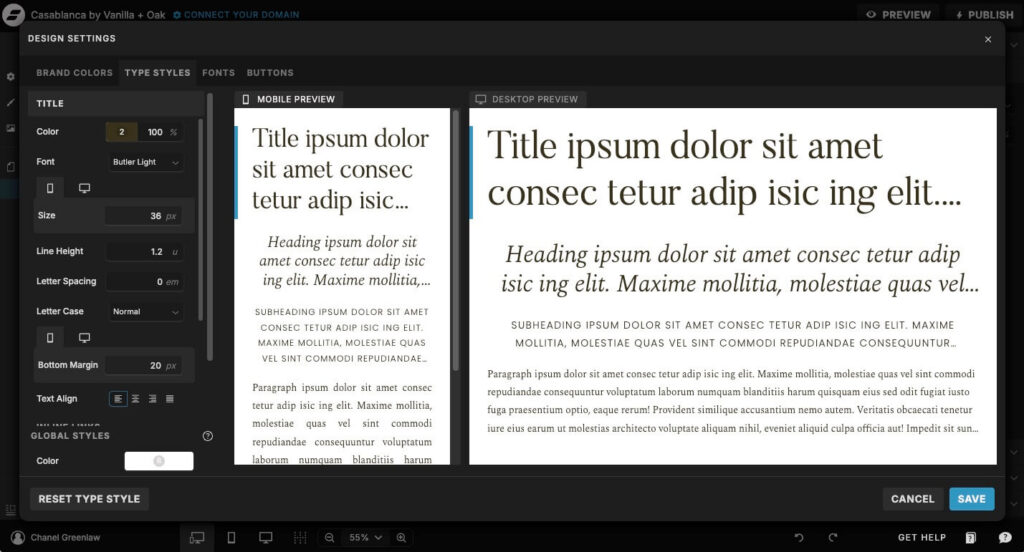
Update your Showit Design Settings — fonts and colors — so they match your brand before you start customizing individual pages. Doing this globally first saves a lot of time.
Step 4: Customize Your Website
Now the fun part. This is where your website actually starts to look like yours.
Decide which pages you need and rename them if desired. Your template likely has more pages built in then you will need when starting out — you can hide or delete what doesn’t apply to you.
Not sure which pages to include? I break it all down here: The Only 5 Pages Your Photography Website Actually Needs.
Swap in your images and logo. Go page by page and replace the placeholder images with your own work. Be thoughtful about which images go where — your homepage especially should show the style of work you most want to book.
Update your written copy. This is the part people procrastinate on most, but it’s also the most important. Your copy is what actually converts visitors into inquiries. Don’t just tweak the placeholder text — rewrite it in your own voice, speaking directly to the clients you want to attract.
Set up your social links and check that all buttons and links click through to the right places. It sounds basic, but broken links are one of the most common (and easy to avoid) issues on new websites.
Embed your email marketing form. Whether you use Flodesk (my personal favourite), Mailchimp, or something else, connecting your email opt-in to your website is worth doing before you launch. Building your list from day one is a smart long-term move.
Hide, delete, or duplicate canvases as needed to fit your content. Showit’s canvas-based system gives you a lot of flexibility here — use it.
Step 5: Pre-Launch Checks
You’re almost there. Before you hit publish, run through these final checks.
Preview your website on both desktop and mobile. Showit gives you separate mobile control, which is a huge feature — but it also means you need to actually check the mobile version. What looks great on desktop can be a mess on mobile if you haven’t adjusted it.
Set your favicon logo if you haven’t already.
Connect your domain. This is the step that makes your website accessible at your actual URL instead of a Showit subdomain. Showit has clear documentation on how to do this, and it usually just involves updating a couple of DNS settings with your domain provider. It can take a few hours to fully propagate.
Step 6: Launch
You’ve done the work. Now go live.
Publish your website in Showit. One button. Do it.
Create some graphics to share on social media. A simple Canva graphic announcing your new site goes a long way. You put in real work to get here — tell people about it.
Don’t Skip the Checklist
Every step above is manageable on its own, but keeping track of where you are in the process is where things tend to fall apart. You get interrupted, come back a few days later, and can’t remember if you renamed your images or connected your domain.
That’s exactly why I put together the free Showit Website Template Launch Checklist — a complete start-to-finish checklist with helpful resource links for every step of the process. It’s the same process I’ve used with every photographer website I’ve built.
A Few Things Worth Knowing
Showit’s support is genuinely good. If you hit a wall, their support team is accessible via live chat and they’re helpful. Don’t spend hours Googling something you could solve in ten minutes with their help center or chatbot.
I also have my very own Vanilla + Oak Help and Support Centre with bite-sized up to date Showit tutorials to help you launch even quicker. Even if you’re not a customer, these videos are available to you.
You don’t have to launch with everything perfect. A live, almost-perfect website beats a perfect website that’s still in draft mode six months from now. Launch with what you have, then keep refining.
Your website is a living thing. The photographers with the best websites aren’t the ones who built something perfect once — they’re the ones who kept updating, improving, and adding to it over time.
Looking for a Showit template to start with? Browse the Vanilla + Oak template shop — all templates are designed specifically for photographers and include everything you need to launch a site that looks and feels completely custom.
DOWNLOAD A FREEBIE
How to Launch a Showit Website Start to Finish
Looking to launch your dream website, but feeling overwhelmed with where to start? From purchasing your domain to publishing your site, this checklist will guide you through each step so you can launch your website with ease.