

It’s tempting to jump straight into customizing your website.
You’ve chosen your template, your photos, and you just want to see it come to life. But before you start dragging images into place, there are a few foundational steps that matter more than most photographers realize.
Properly preparing your images affects your site speed, SEO performance, storage limits, and overall user experience. And while it’s possible to go back and fix things later, it’s far easier to build a simple workflow from the beginning.
Below, I’m walking you through the exact steps I use to prepare images for both Showit pages and blog posts so you can implement this workflow in your own business and confidently optimize your images every time.
Step 1: Rename Your Images Before Uploading
Before you do anything else like resizing or compressing… rename your files!
Search engines cannot interpret your photographs visually. They rely on file names and alt text to understand what an image represents and makes them more searchable and help potential clients find you.
If your images are titled something like…
IMG_4829.jpg
DSC_7367.jpg
They provide no context, and they’re not going to show up on Google. Instead, think about what your clients would actually search for.
A strong file name typically includes:
- Location (city or region)
- Venue (if relevant)
- Type of Session
- Optional: your niche descriptor
For example:
- toronto-distillery-district-wedding.jpg
- banff-elopement-mountain-ceremony.jpg
- vancouver-engagement-session-stanley-park.jpg
Use hyphens between words and keep the name concise. Avoid keyword stuffing or repeating the same phrase across every single image. It’s also best practice to avoid using any symbols in your file names such as “+” or “&” etc.
Should you include your business name? You can, but you do not need to include it in every file. Most people discovering your work are not searching for your brand name yet! They are searching for venues, locations, and session types.
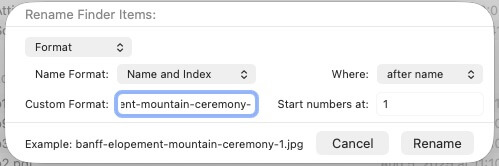
I like to batch rename my files directly in the Mac finder (open finder > command + a to select all > rename), or this can also be done directly in Lightroom.
Step 2: Resize and Export Images for Showit Website Pages
Once your files are properly named, the next step is preparing them for upload inside Showit.
While Showit technically accepts full-resolution images straight from your camera, uploading oversized files is not recommended. Large files increase upload time, especially when adding multiple images at once, such as a full gallery.
Showit will automatically optimize JPG images and serve responsive versions based on the viewer’s device (e.g. laptop vs mobile). Because of this, there is no need to heavily compress your images beforehand. Keep in mind, this does NOT apply to WordPress images that will be used on your blog… we will cover that in the next step.
For standard website pages such as your home page, galleries, or service pages, Showit recommends using the following export settings:
- Resize to 3500 pixels on the long edge
- File type: JPG
- Color profile: sRGB
- DPI: 72 (if your export settings require it)
Batch resizing can be done in Lightroom or Photoshop, but you can also resize images directly on a Mac using the Preview app.
Here’s how to do it:
- Open your image in Preview. If you are resizing multiple images, use command + a to open them together.
- In the top menu bar, select Tools > Adjust Size.
- In the pop-up window, make sure Scale proportionally is checked. Change the long edge of the image to 3500px. If you are batch resizing multiple images, confirm they are all the same orientation before applying the same dimensions.
- Click OK. If you want to keep the dimensions of your original image, make sure to first make a duplicate of the image to re-size.

Why JPG Instead of PNG or SVG?
For photographs, you always want to use JPG file type.
JPG files are designed to handle complex color transitions and detailed imagery efficiently. They maintain strong visual quality while keeping file sizes manageable, which helps your page speed.
PNG files are better suited for graphics with transparent backgrounds, such as logos or icons. Using PNGs for full all your images often results in significantly larger file sizes without any visible benefits, and might even slow down your website speed.
SVG files should only be used for vector graphics, such as logos or icons.
Step 3: Preparing Images for WordPress Blog Posts
Blog images require a slightly different approach because they are managed through WordPress rather than the Showit page builder.
Unlike standard Showit pages, images on blog pages are not automatically optimized in the same way. You will want to resize AND compress to maintain site speed and avoid reaching your blog storage limit.
Recommended Export Settings for Blog Images
Before uploading images to your blog, you can batch resize and export using the following settings in Lightroom or Photoshop:
- Resize to approximately 2400 pixels maximum
- Export as JPG
- Quality settings:
- Lightroom: around 70
- Photoshop: around 7
- Color profile: sRGB
Or as mentioned above, you can use your Mac’s preview tool to resize images.
Additional Compression
After resizing and exporting, run your blog images through a compression tool like TinyPNG before uploading. The Pro version allows batch uploads, which makes this step simple to repeat every time.
Usually, compression reduces your file sizes by 40 to 70 percent. When a blog post includes dozens of images for a gallery, that difference can significantly improve your load speed.
Step 4: Uploading Images to Showit
As you begin uploading your optimized images, take the time to organize your media library properly first. Keeping it structured from the start will make your next upload significantly easier and faster.
Tips to Organize Your Showit Media Library
When making folders in your Showit Media Library, you’ll want to stick with a organization system that works best for you to remember. Some ideas on how to organize your folders are:
- By type of shoot (ie weddings, couples, families, etc)
- A folder for each session or couple
- Add the year to the beginning of the folder name (ie: 2026 Sara & Mike) so that all the years are grouped together in your media library
Once your folders are created, you can start to upload all your images into Showit. The video below will teach you how to upload and organize your content.
The difference between a website that simply looks good and one that performs well often comes down to details like this.
Optimizing your images is one of the simplest ways to improve site speed, support SEO, and create a smoother experience for your visitors.
When these steps become part of your regular workflow, your website becomes stronger, faster, and easier to manage long term.
DOWNLOAD A FREEBIE
How to Launch a Showit Website Start to Finish
Looking to launch your dream website, but feeling overwhelmed with where to start? From purchasing your domain to publishing your site, this checklist will guide you through each step so you can launch your website with ease.


